Setting Point to Multi Point Using RB411AH
Welcome Lunch in this article I will discuss about setting point to multipoint, must have previously been friends already know the difference between point to point by point to multipoint, let me repeat again point to point means a point to point his opponent while the point to multipoint ie one point to many points that can be connected.
Pengerian PTMP
understanding point to multipoint communication according to wikipedia is made through a different type of one-to-many connections, Point-to-multipoint most widely used wireless Internet (Wireless) and IP telephony via radio frequency. Point-to-Multipoint also often abbreviated as P2MP, PTMP or PMP.
Materials prepared
in this tutorial tool that I use as follows:
Router Gateway:
- RB750
Router as AccesPoint:
- RB411AH complete with (Minipci: XR5, Pigtail, Jumper Panel, Big Horn, Box, Adaptor 3A, Poe)
- Lan cable
- Grid Antenna 24 dB
- Groove complete with adapter and poe
- small horn
- Groove complete with adapter and poe
- small horn
Topology

the topology above there are two grooves that one gets ip of routerboard 750 and one of his second RB411AH I deliberately use this way if there is an error please guidance :)
There are 4 routers are we going to the following configuration steps
There are 4 routers are we going to the following configuration steps
Configuration Routerboard 750


The first step I did like the picture above, which makes RB750 can be connected to the Internet
- enter the ip address (ether1: Internet, ether3: Local No 2 ip)
- given ip dns
- give static routing
- check ping google.com
- let the firewall to be accessible mikrotik station
configuration RB411AH
- One is that we are setting Bridge in Port wlan1 and ether1


- We Wireless Settings
Mode: AP Bridge
Frequency: (Specify)
SSID: (Specify)
Radio Name: (Specify)

on the WDS tab
WDS Mode: Dynamic
Default WDS Bridge (Bridge who made earlier)

Setting Ip addresses, dns and static route

Configuring Groove (ip of RB750)
Frequency contents, and scan list in rb411AH then click scan, and Connect

replace the station wds mode, specify radio name

on tap WDS, WDS modes: Dynamic

We enter the ip that we created in the earlier RB750, enter dns, and static route, and check ping google or etc

Configuring Groove (ip from RB411AH)
Setting mode, frequency = rb411ah, scan list: between frequency rb411ah
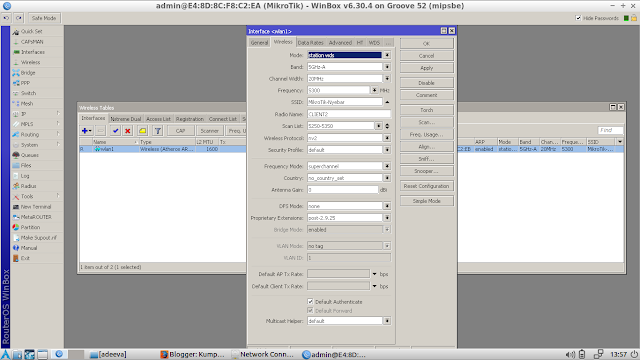
Tap WDS: Dynamic
default wds bridge: none

We dhcp client, previously dhcp server beforehand in ether wlan in rb411AH, then check ping Once bound to the internet


give ip address, according to the image above, then give ip nat firewall so that the local ip changed as if the public ip who was surfing on google / internet, otherwise you dhcp server, then put a static ip on your computer / laptop

No comments:
Post a Comment