How To Change Template Voucher Hotspot Mikrotik
Template Mikrotik Hotspot Vouchers can we change with a wide range of views is more exciting than to see its default Mikrotik Hotspot Voucher. On Tutorial Mikrotik Indonesia this time you can download Hotspot Mikrotik Template Voucher for Free and replace it in your Mikrotik User Manager.
Before starting this Mikrotik Tutorial, make sure you've integrated it with the Mikrotik Hotspot Server Mikrotik User Manager. If not please read the following article:
Tutorial How to Make Voucher Hotspot Mikrotik Mikrotik on User Manager
In the article has been described in detail how to create a hotspot to hotspot voucher template by replacing her, but there is no explanation for adding a new template and print templates and automated mass.
Let's start Tutorial How To Change Template Voucher Hotspot Mikrotik :
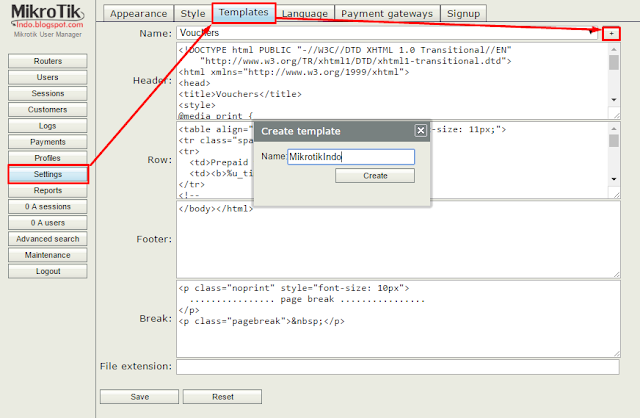
1. Login to User Manager Mikrotik -> Go to Settings -> Templates
2. Click the + button on the right -> Name the voucher template that you will create.
3. Enter the voucher template script mikrotik hotspot in the field provided.
4. You can download Hotspot Mikrotik Voucher Template following:
Download Voucher Hotspot: HTML code for Header
  <! - It's Beginning HEADER ->
 <! DOCTYPE html PUBLIC "- // W3C // DTD XHTML 1.0 Transitional // EN"
     "Http://www.w3.org/TR/xhtml1/DTD/xhtml1-transitional.dtd">
 <Html xmlns = "http://www.w3.org/1999/xhtml">
 <Head>
 <Title> Vouchers </ title>
 <Style>
 @media print {
   .noprint {
     display: none;
   }
   .pagebreak {
     page-break-after: always;
   }
 }
 body
 {
    padding: 0;
    margin: 0;
    min-width: 700px;
    color: # 303F50;
    font-size: 10px;
    font-family: Arial, 'Arial Unicode MS', Helvetica, Sans-Serif;
    line-height: 85%;
 }
 .mikrotikindo table, table.mikrotikindo
 {
    border-collapse: collapse;
    margin: 2px;
 }
 .mikrotikindo th, td .mikrotikindo
 {
    padding: 2px;
    border: 1px solid # 2B78C5;
    vertical-align: top;
    text-align: center;
 }
 .vertical-text {
 transform: rotate (90deg);
 padding: 4px;
 float: right;
 font-size: 15px;
 margin-top: 8px;
 width: 10px;
 color: # 2B78C5;
 }

 </ Style>

 </ Head>
 <Body>
 <! - End It HEADER ->
  <! - It's Beginning ROW ->
 <Table class = "mikrotikindo" style = "display: inline-block; background-color: # 2B78C5; border-top-width: 0px; border-right-width: 0px; border-bottom-width: 0px; border-left -width: 0px; border-style: initial; border-color: initial; width: 200px; height: 120px; "> <tbody> <tr> <td style =" width: 190px; text-align: center; "> <span style = "font-weight: bold; color: rgb (255, 255, 255); font-size: 11px; font-family: Tahoma;"> mikrotikIndo </ span> most <table class = "mikrotikindo "style =" background-color: # FFF8DC; border-top-width: 0px; border-right-width: 0px; border-bottom-width: 0px; border-left-width: 0px; border-style: initial; border -Color: initial; width: 100%; margin-right: auto; margin-left: auto; "> <tbody> <tr> <td style =" width: 50%; text-align: center; "> Package < / td> <td style = "width: 50%; text-align: center;">% u_actualProfileName% </ td> </ tr> <tr> <td style = "width: 50%; text-align: center ; "> Data limit </ td> <td style =" width: 50%; text-align: center; ">% u_limitDownload% </ td> </ tr> <tr> <td style =" width: 50% ;  text-align: center; "> Time Limit </ td> <td style =" width: 50%;  text-align: center; ">% u_limitUptime% </ td> </ tr> <tr> <td style =" width: 50%;  text-align: center; "> Validity </ td> <td style =" width: 50%;  text-align: center; ">% u_timeLeft% </ td> </ tr> </ tbody> </ table> <table class =" mikrotikindo "style =" border-top-width: 0px;  border-right-width: 0px;  border-bottom-width: 0px;  border-left-width: 0px;  border-style: initial;  border-color: initial;  width: 100%;  margin-right: auto;  margin-left: auto; "> <tbody> <tr> <td style =" width: 50%;  text-align: center; "> <span style =" color: rgb (255, 255, 255);  font-family: Tahoma; "> Username </ span> </ td> <td style =" width: 50%;  text-align: center; "> <span style =" color: rgb (255, 255, 255);  font-family: Tahoma; "> Password </ span> </ td> </ tr> <tr> <td style =" background-color: # FFFFFF;  width: 50%;  text-align: center; "> <span style =" color: rgb (163, 180, 200);  font-family: Tahoma; ">% u_username% </ span> </ td> <td style =" background-color: # FFFFFF;  width: 50%;  text-align: center; "> <span style =" color: rgb (163, 180, 200);  font-family: Tahoma; ">% u_password% </ span> </ td> </ tr> </ tbody> </ table> <table class =" mikrotikindo "style =" border-top-width: 0px;  border-right-width: 0px;  border-bottom-width: 0px;  border-left-width: 0px;  border-style: initial;  border-color: initial;  width: 100%;  margin-right: auto;  margin-left: auto; "> <tbody> <tr> <td style =" width: 40%;  text-align: left; "> <span style =" color: rgb (255, 255, 255);  font-family: Tahoma; "> 100 Mbps </ span> </ td> <td style =" width: 60%;  text-align: right; "> <span style =" color: rgb (255, 255, 255);  font-family: Tahoma; "> mikrotikindo.blogspot.com </ span> </ td> </ tr> </ tbody> </ table> </ td> <td style =" background-color: # FFFFFF;  width: 10px;  text-align: center; "> <div align =" center "class =" vertical-text "> USD & nbsp;% u_moneyPaid% </ div> </ td> </ tr> </ tbody> </ table>
 <! - This Weekend ROW ->
Download Voucher Hotspot: HTML code to Footer
  <! - It's Beginning Footer ->
 </ Body> </ html>
 <! - End It Footer ->
Download Voucher Hotspot: HTML code to Break
  <! - It's Beginning BREAK ->
 <P class = "noprint" style = "font-size: 10px"> ................ page break ............... . </ p> <p class = "pagebreak"> & nbsp; </ p>
 <! - This Weekend BREAK ->
5. Please your script Edit the hotspot voucher to your liking. Can use Notepad ++, Dreamweaver or other HTML editor.
6. If you have edited, please copy of his script its corresponding section in the Settings menu -> Templates
7. If it is appropriate click Save.
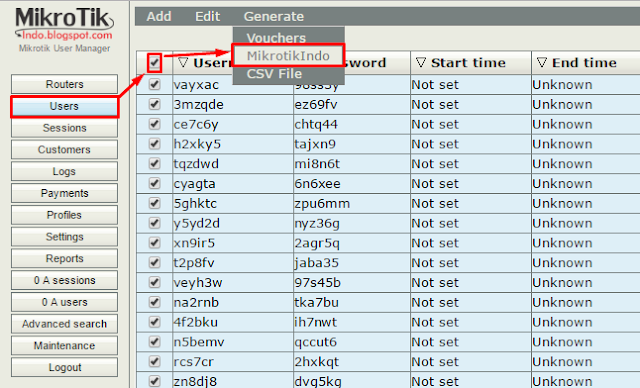
8. Next we try to generate voucher hotspot mikrotik her. Go to the menu Users -> Generate -> Choose a voucher template name that you have created.
9. It would appear as shown below:
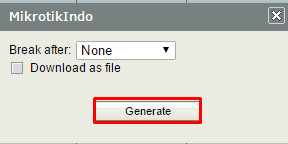
10. Click Generate -> click on "Click here if the popup did not show up"
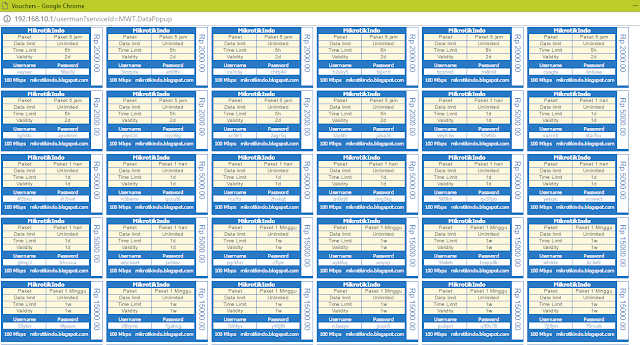
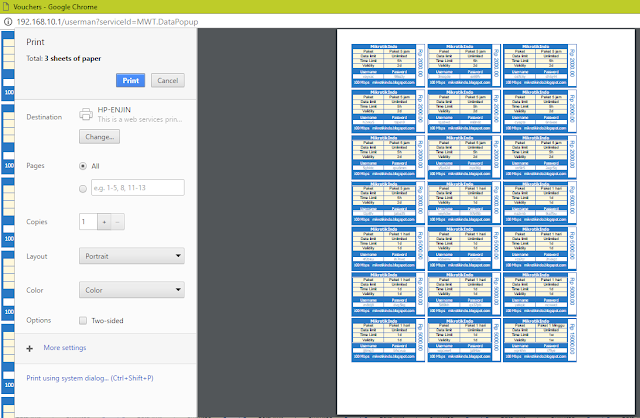
11. It would appear that the contents Popup Window Voucher Hotspot Mikrotik you generate
12. Well, to print it, please click CTRL + P on the keyboard
13. Layout voucher will adjust the margins of paper used. Just choose the printer and print.


well
ReplyDeleteDoesn't work :(
ReplyDeleteyea formatter broke it all
ReplyDelete